
online
Canary | Caves 2 electric boogaloo
20/7/2023
In my previous blogpost we created scripts for procedurally generating finite caves in unity on a grid using prefab instances. Although this method had its perks, mostly being able to easily generate structures within the cave, I was still unhappy, it was slow, limited, and looked really not great™. I found myself feeling extremely inspired after re-watching a video series by Sebastian Lague (link) and a seeing video by Acerola (other link).
This is barely a sequel to the original generation, and calling it a complete rewrite is still an understatement.
So, what if I used perlin noise functions to generate my terrain? Here was the list of things I'd need to do in order to make this work.
-
Research methods for creating meshes using perlin noise. The Procedural Landmass Series (linked above) was a huge help.
-
Tweak generation parameters and methods to create caves instead of landmasses.
-
Ensure that the normal calculations allowed for good lighting and shading.
-
Find a way to alter the cave generation to create procedural structures inside of the cave.

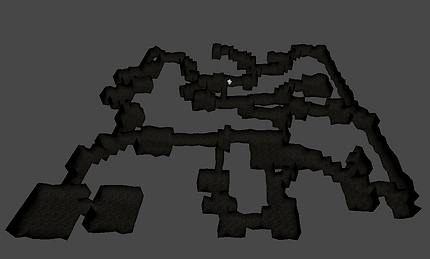
This is the old generation.


This is the new, improved generation.
One of the biggest advantages of switching to a noise based generation algorithm means that we are creating bitmap textures that are used to create the mesh for each tile in our procedural grid. This is extremely useful for creating procedural structures, because we can inject our own texture data into the bitmaps generated by the noise algorithm to create empty spaces and entry points for custom caves areas and structures.

I utilized a lot of standard additions typically seen in terrain generation (lacunarity, amplitude, frequency and octaves), but I also found that making a slight alteration the output of the noise algorithm helped me generate more cave like structures.
When we are assigning the value of each pixel in our bitmap image, We subtract 0.5 from the absolute value of the noise height.
noiseMap[x, y] = Mathf.Abs(noiseHeight)-0.5f;
This means that we are left with a very well defined, winding seam when the noise value is close to 0.5. This seam will become the lowest point in our cave floors (and the highest point in our cave ceilings). Structure data is then injected into the resulting noise texture, They will be more complex in future but are currently just square rooms complimented by falloff maps to blend them into the surrounding terrain.
This is what a typical tile looks like after generating the noise and inserting structures.

Here is a crude diagram showcasing what happens to the output of the noise algorithm when using the above code snippet. These values are later normalized which is why the above image is displayed differently.
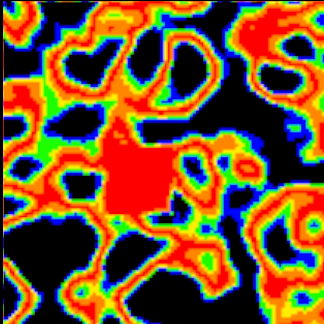
Note that structure and noise seeds are not linked, so the structure is in a different location.
This is the fun part. Now we take our texture data and a separate texture that will be used by our mesh generation script. This is really useful as it means that we have a quick way to test noise settings and can easily see changes made in our generation parameters.
Notice how the squiggles from the previous texture how now turned into winding cave passages. The higher values that were seen as closer to white in the previous texture are now clamped at an arbitrary value to form the basis for our cave walls. During mesh generation, we cull the verities are placed at this value, meaning that we aren't generating any mesh data outside of our cave system.
We do still use the previous texture to add detail while generating the mesh, but the majority mesh is created using this texture.
This diagram roughly showcases a 2D slice of our cave system, the actual scaling parameters are more complex than what has been demonstrated here, but the concept is more or less the same.
The mesh generation was absolutely the most time consuming part of this project, and I won't be going into detail, but I will give an overview of the process.
-
We create mesh data for the ceiling and the floor at the same time, but use different scaling parameters.
-
We cull any triangles and verticies that are outside / not visible within the cave system. (the black area in the above texture)
-
We weld our vertices, remove duplicates and calculate the surface normals based on a given smoothing angle.
The system I've implemented also utilizes LODding, multi-threading, triplanar shaders and a bunch of other neat stuff. I'm actively working on improving the shaders used on the cave, implementing actual structures (At the moment its just a a debugging structure for testing accessibility and bounds). I am extremely happy with the progress that has been made and have included some videos of me exploring and showcasing the caves below.
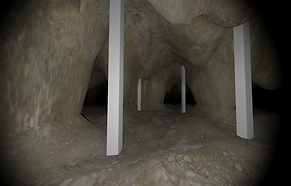
Debugging structure found in caves.
Cave Exploration
LOD and procedural genertaion
Thanks for reading!